It is a truth that fire wood heats you multiple times. It heats you up when you cut down the tree and shop up the wood. It heats you up when you move it around and stack it to dry. It heats you up when you bring it in to the furnace. And it heats you by the burning of the wood.
I am getting plenty of heating, this week. The Lord miraculously answered our prayer for firewood by providing an ample supply of logs close by. We likely have a seasons worth just from this week, which is a blessing because we have not done much prior. I sure had some sweat on my brow today!
Thinking of the title of my humble little blog: By the Sweat of My Brow, I realize what we wanted to communicate was that a life worth living is not an easy life, and life was really not meant to be easy. Leisure has gotten too many good marks, and hard work too many bad marks in our society. There is nothing wrong with working hard, and even seeing some drops of sweat fall from your face.
But I am constantly faced with the pull to take the easy path. There are only so many hours in a day, and no one has been handing out extra hours around my part of the country.
You can cut, move, stack, and dry your fire wood, or you could pay for electricity to do all that work for you.
You can buy a bag of flour, or you can work your tail off preparing the ground, planting wheat, protecting the crop, harvesting, threshing, storage, and grinding to get to the same point. It is simply astounding how much we take for granted in our western society lifestyle. The super market is so instant gratification. The old fashioned alternative takes a year of planning to get a crop.
You can work for an hour or two making 5 loaves of bread, or you can simply buy them for $2.39 each at the store.
I don't know a way to settle my tension. I enjoy gardening and living simply. I enjoy putting up food. I love the idea of self sufficiency. But it seems hard to try to do both lifestyles at the same time. This is not to discourage you, my one reader, because I do think there is value in not just giving into the downward flow of our "everything is disposable society."
When I think who is paying the true cost for my convenient grocery trips I think of the migrant worker making low wages, who definitely has sweat on his brow. And I think about the false economy of a petroleum based agriculture system, that really is borrowing from past reserves, with no intention of paying back that energy debt.
So in a philosophical turn, I have a suggestion for you: Live your life to make a difference in the life of someone else.
If you look over the frequency of my posts, you will have already seen a slowing pace. I think it is a normal life cycle for blogs. I started this blog with the intent to share knowledge, and not to just talk about us. We have used pseudonyms to emphasis this point. It is not about Sunshine and Harvest. It is about getting a connection to God, and becoming His child.
For each of us, life is a vapor. The older I get, the more I am willing to embrace my mortality. But to dust where we return does not have to be the end of the story. I pray that you will consider the Bible as perspective for the meaning of life. It points you to a loving God who wants to have you live with Him forever.
I hope something we have written on this blog has been a blessing to you. The next chance you get, embrace hard work, and get the joy of having sweat on your brow.
Showing posts with label homesteading. Show all posts
Showing posts with label homesteading. Show all posts
Thursday, August 21, 2014


Sunday, May 25, 2014
Karen, the beautiful
I had just come into the house from the orchard, and Sunshine said as matter of factly as discussing the current weather, "I think we should learn the Karen language." This was completely out of the blue. And less than 12 hours later, I am writing this post while sitting in a Burmese convocation representing several eastern USA states. We drove this morning down to Indianapolis for this all day meeting.
.JPG) Karen is a tonal language, one dialect of the country called Myanmar. This country was previously known as Burma. There are over 100 language groups in Myanmar. If you have ever studied about tonal languages, you will know that the same word completely changes it's meaning depending on very subtle tonal changes or inflections on the word. An example from today: "Duhblu" means "thank you", while "Duhblu" also means "your crazy!" Of course there must be a difference in how these identical works are said. Sunshine thinks a harder "u" at the end means "your crazy". Your mileage may vary.
Karen is a tonal language, one dialect of the country called Myanmar. This country was previously known as Burma. There are over 100 language groups in Myanmar. If you have ever studied about tonal languages, you will know that the same word completely changes it's meaning depending on very subtle tonal changes or inflections on the word. An example from today: "Duhblu" means "thank you", while "Duhblu" also means "your crazy!" Of course there must be a difference in how these identical works are said. Sunshine thinks a harder "u" at the end means "your crazy". Your mileage may vary.
This means that tonal languages are hard for westerners to learn. Since a year long stint of Espanol in college has left long lasting fruit of a handful of Spanish words, I would not say I am the most promising or proficient language student.
My first impression about Sunshine's language learning challenge was, wow, that will be hard! But it is not our abilities that matter, what matters is God's ability. I don't know if language learning is in our future, but what I do know if that the poor and displaced need our prayers and care.
A refugee arriving in the USA comes with very little. They may have no financial resources, and are expected to repay their travel expenses. They don't know the language or the culture. They have been torn from their farms and gardens. How can they find jobs, education and religious support? If you have followed our blog, you know refugee ministries has been a part of our thinking for some time. We are looking for what part we can play to help them. Here is an interesting thought from the pen of inspiration:
Wikipedia states: "Aside from Burmese and its dialects, the hundred or so languages of Burma include Shan (Tai, spoken by 3.2 million), Karen languages (spoken by 2.6 million), Kachin (spoken by 900,000), various Chin languages (spoken by 780,000), and Mon (Mon–Khmer, spoken by 750,000)." (reference)
Why not dream with me? What if we had 100 or more acres of suitable land. And on this land, we made a beautiful pattern or collection of homesteads. Perhaps 2 acres each, where we build a very modest, one story home that could rest in the center of their gardens. No field would be very far from the home, and each family could have space of their own. A new refugee family is allowed 2 years rent free, The father could work 1/2 time at a cash job, and 1/2 time at his homestead garden. The mother would stay at home, 1/2 time educating her children, and 1/2 time working in their garden. After two years, they would pay rent, or work to establish a new homestead which would be permanently their own. Some cost for the land could be paid over ten years, and then the land is owned free and clear.
Community resources like a church / meeting house would be built, a school for ESL, parent tutoring so the mothers can teach their children, a commercial kitchen, so food could be prepared and sold, a pole barn with power tools that could be shared for a rental fee to the homesteaders, a market stand for selling produce to the public - farmers market style.
I don't need to create a commune, but rather this could be a supportive collection of independent homesteads. This idea would be so cool. I think it would be great to have one of these in each state. Any investors out there?
This means that tonal languages are hard for westerners to learn. Since a year long stint of Espanol in college has left long lasting fruit of a handful of Spanish words, I would not say I am the most promising or proficient language student.
My first impression about Sunshine's language learning challenge was, wow, that will be hard! But it is not our abilities that matter, what matters is God's ability. I don't know if language learning is in our future, but what I do know if that the poor and displaced need our prayers and care.
A refugee arriving in the USA comes with very little. They may have no financial resources, and are expected to repay their travel expenses. They don't know the language or the culture. They have been torn from their farms and gardens. How can they find jobs, education and religious support? If you have followed our blog, you know refugee ministries has been a part of our thinking for some time. We are looking for what part we can play to help them. Here is an interesting thought from the pen of inspiration:
"Great benefits would come to the cause of God in the regions beyond, if faithful effort were put forth in behalf of the foreigners in the cities of our homeland. Among these men and women are some who, upon accepting the truth, could soon be fitted to labor for their own people in this country and in other countries. Many might return to the places from which they came, in the hope of winning their friends to the truth. They could search out their kinsfolk and neighbors, and communicate to them a knowledge of the third angel’s message."— ChS 200.4The most effective outreach to these dear people would be to know their language, and help them with acclimatization: helping them find a job, and a church. I think it would be a real blessing to have land that they could cultivate and grow their own food.
Wikipedia states: "Aside from Burmese and its dialects, the hundred or so languages of Burma include Shan (Tai, spoken by 3.2 million), Karen languages (spoken by 2.6 million), Kachin (spoken by 900,000), various Chin languages (spoken by 780,000), and Mon (Mon–Khmer, spoken by 750,000)." (reference)
Why not dream with me? What if we had 100 or more acres of suitable land. And on this land, we made a beautiful pattern or collection of homesteads. Perhaps 2 acres each, where we build a very modest, one story home that could rest in the center of their gardens. No field would be very far from the home, and each family could have space of their own. A new refugee family is allowed 2 years rent free, The father could work 1/2 time at a cash job, and 1/2 time at his homestead garden. The mother would stay at home, 1/2 time educating her children, and 1/2 time working in their garden. After two years, they would pay rent, or work to establish a new homestead which would be permanently their own. Some cost for the land could be paid over ten years, and then the land is owned free and clear.
Community resources like a church / meeting house would be built, a school for ESL, parent tutoring so the mothers can teach their children, a commercial kitchen, so food could be prepared and sold, a pole barn with power tools that could be shared for a rental fee to the homesteaders, a market stand for selling produce to the public - farmers market style.
I don't need to create a commune, but rather this could be a supportive collection of independent homesteads. This idea would be so cool. I think it would be great to have one of these in each state. Any investors out there?
Wednesday, September 25, 2013
Gardening lessons from 2013
This growing season has been a good year for learning, and gives hints of a lot more yet to learn. I thought I would record some of the take home lessons that I want to remember in the future, and that you may find valuable as well.
1) Weeds grow fast. Weeds hurt a garden. Removing weeds takes a lot of work (and sweat). Since the sweat of my brow is the title of this blog, I have put this item first. Weeding takes time, and there are critical periods to perform weeding where if you don't kill the weeds when small, they will forever later be an issue for the garden.
a) Wire cages make it really, really hard to weed inside the cage.
b) Row widths need to be wide enough to run a tiller down the path to help cut down the work. One foot of walkway may be harder to keep clear of weeds than 3 feet of walkway, if you have a tiller to help chew through the path, and throw dirt up on the weeds in the growing row.
c) Plastic ground cover does a very good job of keeping out weeds. We put down plastic for the first time this year. We used it under our sweet potatoes, and had very good results.
d) Wood chips are great for weed control. The occasional weed that does come up is easily pulled out.
e) Weeding the entire garden on a rotation schedule would be ideal, and not let it get out of hand. To be honest, I am not sure if I have ever had complete control of weeds to date, so this is a goal.
 2) Wood chips may slow down vegetable growth rates. It is hard for us to separate out the cooler summer here in the north country but crop harvest dates are way late. Some of the difference seems to have been that we planted our melons in an area covered with wood chips. (Just to be clear, we moved the chips aside, and planted in soil, with the melons growing out over the wood chip area.
a) The climate over the wood chips may be cooler and slow melon development.
b) The wood chips may have interacted with the top layer of soil robbing it of nitrogen. Note we have taken great care not to till in the wood chips into the soil, so I was not as concerned about nitrogen loss.
3) Spraying with something is required to preserve the harvest. I started the year a bit optimistic, that grapes could be managed without spray. This was my first year for a grape harvest, and I have now been educated. I could handle the bugs with a vineyard small enough to manually police the vines on a regular bases, and manually destroying the Japanese Beetles present. But with heavy spring rains, our grape bunches developed black rot, and we lost about 50% of our entire crop. We would have lost 100% within another week, but I was able to halt the fungus with an organic spray of copper sulfide solution. Now I know this should have been applied proactively, not reactively.
Apple scab took out most of our apple harvest this year. I did not spray at all, and should have. We had two apples stay on one tree as our total apple harvest, and they were badly marked with apple scab. Apple scab is a significant issue, and I am not impressed with our apple varieties resistance. Only the Galarina seems unscathed by the apple scab. Crimson Crisp show susceptibility to leaf curl and apple / cedar rust. It is doing the poorest of all our apple trees. Complete leaf cleanup this fall, and early spraying next spring may allow a harvest next year.
 4) Fava beans are not as easy as I thought when I exuded enthusiasm over them this spring. The seeds we obtained were not able to outgrow the weeds, and weeding that size of a plot was a lot of work. Then the aphids took over and crippled the plants, being so thick the entire plant would appear black. I did not want to apply any commercial bug killers, and did not take the time to experiment with soap sprays-- life being characteristically busy right at that critical time. The beans we did get to maturity were not easy to harvest, shell or clean. I did not get even one good meal out of that entire plot. We used it as a cover crop, and tilled it in. As a cover crop, it may have been more expensive for seed and effort than it was worth.
5) Progressive planting is required for progressive harvests. Duh. Failure in the first, leads to... you get the point. Some things this year were just so delayed, like a month behind. Long season items (watermelon, cantaloupe, peppers, tomatoes, etc) took a lot longer to start producing, and that likely is just the result of a cooler summer. But the progressive harvests were missed out on again. I think for me the challenge is back to the weekly schedule, and regularly planting.
6) Home grown peaches are a dream of lovely sweetness. If at all possible, try growing peaches. No sprays (yet), and we had a small harvest this year. I can hardly wait to see how next year sets. Perhaps this next year we will get some of our other fruits as well.
If I think of more lessons, I will add to the above. Did you learn any lessons this year? I welcome your comments.
1) Weeds grow fast. Weeds hurt a garden. Removing weeds takes a lot of work (and sweat). Since the sweat of my brow is the title of this blog, I have put this item first. Weeding takes time, and there are critical periods to perform weeding where if you don't kill the weeds when small, they will forever later be an issue for the garden.
a) Wire cages make it really, really hard to weed inside the cage.
b) Row widths need to be wide enough to run a tiller down the path to help cut down the work. One foot of walkway may be harder to keep clear of weeds than 3 feet of walkway, if you have a tiller to help chew through the path, and throw dirt up on the weeds in the growing row.
c) Plastic ground cover does a very good job of keeping out weeds. We put down plastic for the first time this year. We used it under our sweet potatoes, and had very good results.
d) Wood chips are great for weed control. The occasional weed that does come up is easily pulled out.
e) Weeding the entire garden on a rotation schedule would be ideal, and not let it get out of hand. To be honest, I am not sure if I have ever had complete control of weeds to date, so this is a goal.

a) The climate over the wood chips may be cooler and slow melon development.
b) The wood chips may have interacted with the top layer of soil robbing it of nitrogen. Note we have taken great care not to till in the wood chips into the soil, so I was not as concerned about nitrogen loss.
3) Spraying with something is required to preserve the harvest. I started the year a bit optimistic, that grapes could be managed without spray. This was my first year for a grape harvest, and I have now been educated. I could handle the bugs with a vineyard small enough to manually police the vines on a regular bases, and manually destroying the Japanese Beetles present. But with heavy spring rains, our grape bunches developed black rot, and we lost about 50% of our entire crop. We would have lost 100% within another week, but I was able to halt the fungus with an organic spray of copper sulfide solution. Now I know this should have been applied proactively, not reactively.
Apple scab took out most of our apple harvest this year. I did not spray at all, and should have. We had two apples stay on one tree as our total apple harvest, and they were badly marked with apple scab. Apple scab is a significant issue, and I am not impressed with our apple varieties resistance. Only the Galarina seems unscathed by the apple scab. Crimson Crisp show susceptibility to leaf curl and apple / cedar rust. It is doing the poorest of all our apple trees. Complete leaf cleanup this fall, and early spraying next spring may allow a harvest next year.
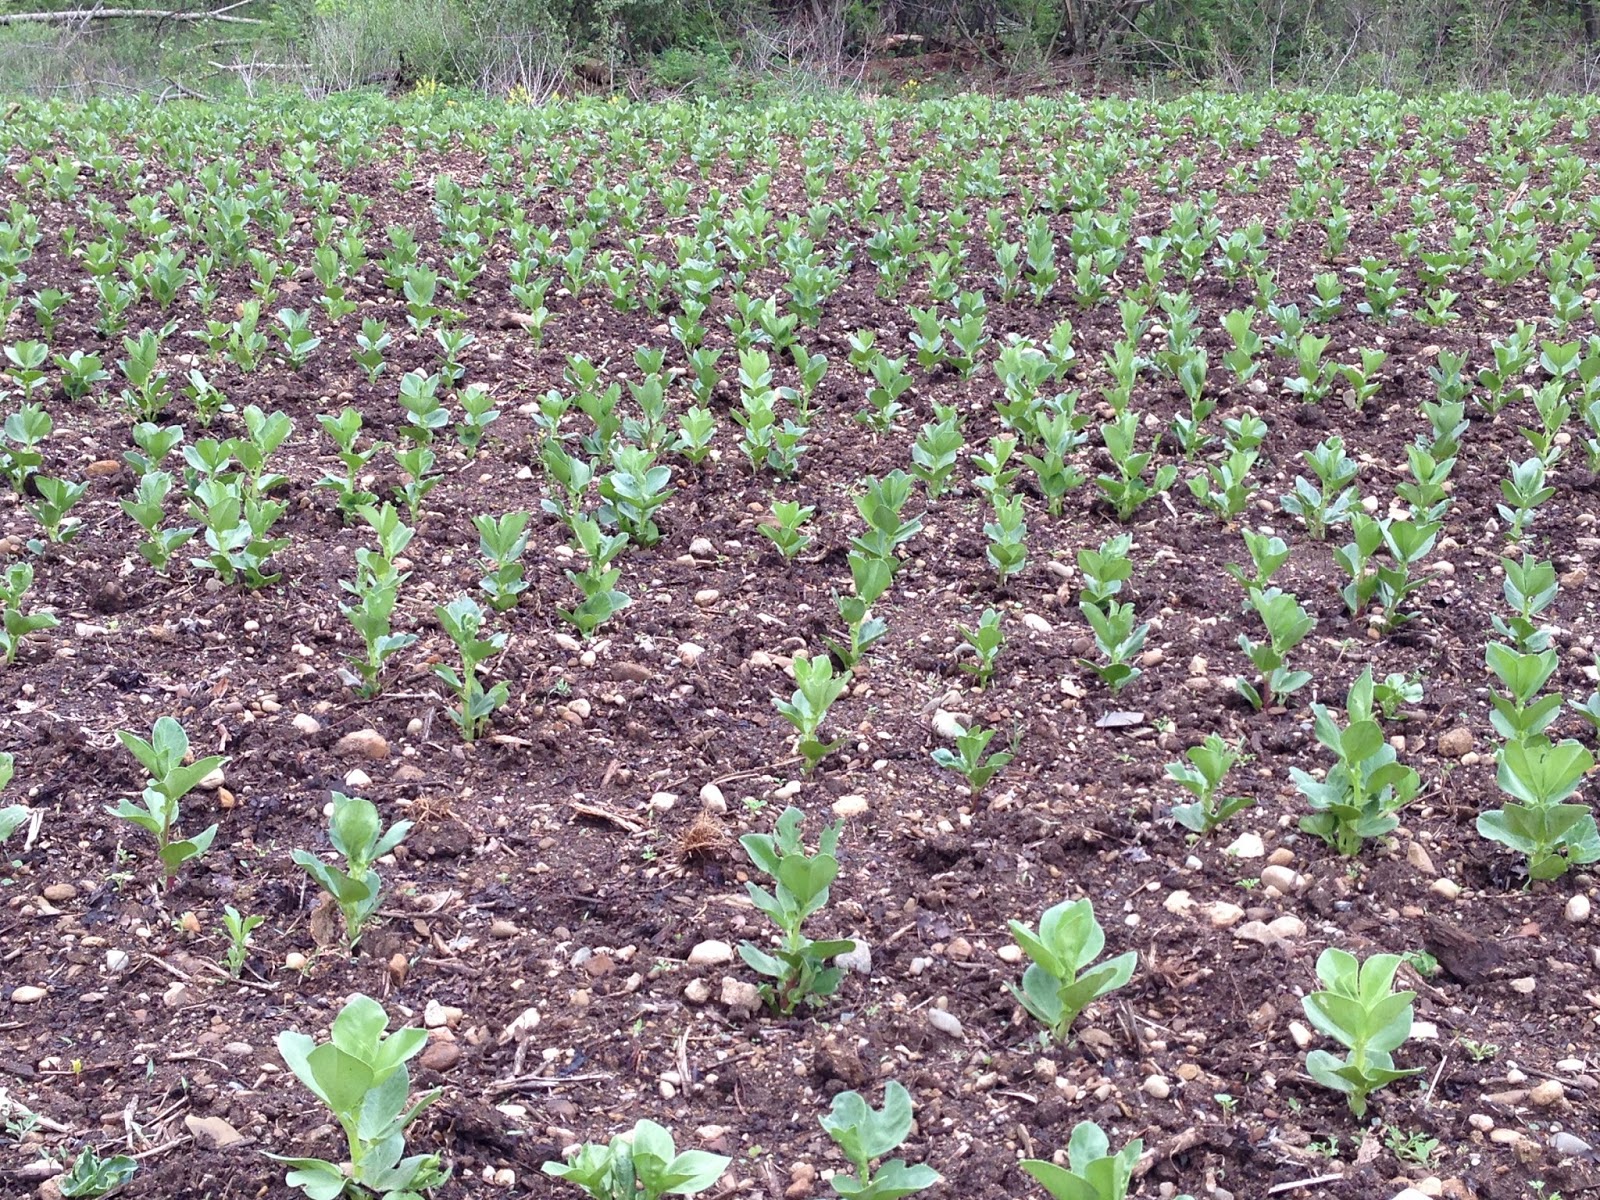 4) Fava beans are not as easy as I thought when I exuded enthusiasm over them this spring. The seeds we obtained were not able to outgrow the weeds, and weeding that size of a plot was a lot of work. Then the aphids took over and crippled the plants, being so thick the entire plant would appear black. I did not want to apply any commercial bug killers, and did not take the time to experiment with soap sprays-- life being characteristically busy right at that critical time. The beans we did get to maturity were not easy to harvest, shell or clean. I did not get even one good meal out of that entire plot. We used it as a cover crop, and tilled it in. As a cover crop, it may have been more expensive for seed and effort than it was worth.
5) Progressive planting is required for progressive harvests. Duh. Failure in the first, leads to... you get the point. Some things this year were just so delayed, like a month behind. Long season items (watermelon, cantaloupe, peppers, tomatoes, etc) took a lot longer to start producing, and that likely is just the result of a cooler summer. But the progressive harvests were missed out on again. I think for me the challenge is back to the weekly schedule, and regularly planting.
6) Home grown peaches are a dream of lovely sweetness. If at all possible, try growing peaches. No sprays (yet), and we had a small harvest this year. I can hardly wait to see how next year sets. Perhaps this next year we will get some of our other fruits as well.
If I think of more lessons, I will add to the above. Did you learn any lessons this year? I welcome your comments.
Wednesday, February 27, 2013
The Joy of Modesty
Modesty is a joy.
In modesty I am talking out the entire way we carry ourselves. It is in how we act and how we dress. Modesty is a precious thing, that I feel it needs to be dusted, polished, and returned to its rightful place in our families.
Our physical form has public space and private space. To be modest means you value yourself enough to protect the private space for your spouse. The focus of modesty is to draw others attention to the public space, and minimize attention to the private space. With that broad principle, you can make your own applications to what is appropriate in action and dress.
But you have to realize that there is a gender difference in what draws the attention. As a generalization, females are drawn by physical touch, and males are drawn by visual cues and form. Males should take care to not draw out affection via touch (1 Cor 7:1), and females should take care to not draw out attention via suggestive dress or exposure of the private spaces (Job 31:1). The male mind has a wonderful ability to fill in spacial patterns. It is part of what God designed in the brains of men. When presented with the rounded leg shape of the thigh (in pants or especially bare) the male mind is drawn to where the spacial pattern meets at the crotch. The male mind does the same spacial patterns related to the female chest when exposed by a low neck line or buttock with skin tight clothing.
Ladies have no need to see men's underwear because of low hanging pants, and men have no need to see the crisp outlines of women's underwear hems through their pants. Looking at modern dress, we see little left to the imagination. Both male and female dress styles seem bent on evocative skin exposure. If clothing does happen to cover the skin, then it is drawn so tight as to be "skin tight" and negating the covering of the skin at all. But does this exposure preserve the joy found in modesty?
It seems to me that there is a deep beauty in a man being properly dressed in appropriate attire, to represent Jesus in his interactions with others, and even that his clothing could be in agreement with the focus of his life. There is a special blessedness seeing a woman in a modest dress, with length well below the knees. My eye is drawn to the radiant face, and I know there is extra beauty preserved within. She is saving herself for the one who would prize and cherish her most; for the one to whom in God's blessing of matrimony she belongs.
And in this modesty there is joy.
Living in the day close to the coming of Jesus means that we have a higher standard to reach than before. "Behold, I come as a thief. Blessed is he that watcheth, and keepeth his garments, lest he walk naked, and they see his shame." Rev. 16:15.
There are some action items I would like to suggest:
I have no interest in suppression of women, or in making them subservient or of lesser importance. I think modesty in its proper setting elevates and ennobles manhood and womanhood It shows the appreciation of their innate value, and wanting to preserve and protect it.
Cheers to the beauty and joy of modesty!
In modesty I am talking out the entire way we carry ourselves. It is in how we act and how we dress. Modesty is a precious thing, that I feel it needs to be dusted, polished, and returned to its rightful place in our families.
Our physical form has public space and private space. To be modest means you value yourself enough to protect the private space for your spouse. The focus of modesty is to draw others attention to the public space, and minimize attention to the private space. With that broad principle, you can make your own applications to what is appropriate in action and dress.
But you have to realize that there is a gender difference in what draws the attention. As a generalization, females are drawn by physical touch, and males are drawn by visual cues and form. Males should take care to not draw out affection via touch (1 Cor 7:1), and females should take care to not draw out attention via suggestive dress or exposure of the private spaces (Job 31:1). The male mind has a wonderful ability to fill in spacial patterns. It is part of what God designed in the brains of men. When presented with the rounded leg shape of the thigh (in pants or especially bare) the male mind is drawn to where the spacial pattern meets at the crotch. The male mind does the same spacial patterns related to the female chest when exposed by a low neck line or buttock with skin tight clothing.
Ladies have no need to see men's underwear because of low hanging pants, and men have no need to see the crisp outlines of women's underwear hems through their pants. Looking at modern dress, we see little left to the imagination. Both male and female dress styles seem bent on evocative skin exposure. If clothing does happen to cover the skin, then it is drawn so tight as to be "skin tight" and negating the covering of the skin at all. But does this exposure preserve the joy found in modesty?
It seems to me that there is a deep beauty in a man being properly dressed in appropriate attire, to represent Jesus in his interactions with others, and even that his clothing could be in agreement with the focus of his life. There is a special blessedness seeing a woman in a modest dress, with length well below the knees. My eye is drawn to the radiant face, and I know there is extra beauty preserved within. She is saving herself for the one who would prize and cherish her most; for the one to whom in God's blessing of matrimony she belongs.
And in this modesty there is joy.
Living in the day close to the coming of Jesus means that we have a higher standard to reach than before. "Behold, I come as a thief. Blessed is he that watcheth, and keepeth his garments, lest he walk naked, and they see his shame." Rev. 16:15.
There are some action items I would like to suggest:
- Each of us would do well to evaluate the message our clothing portrays, and allow this inspection to yield the best possible sermon that our clothing could present to others. We are bought with a price, therefore we are God's not our own.
- I suggest that married men compliment their wives on modest dress. It is not easy for women to buck the world's fashion system. They will appreciate your support that they are wearing dresses, and knowing you appreciate their saving themselves for you. Let them know you value them.
- It would be good for fathers of young women to share their appreciation of modesty. I would hope this would be more in the line of praise and affirmation rather than rules. To have a young woman decide to save herself from the hands and eyes of others is a truly precious thing.
- I would like to see male peers affirm modesty in young women. I think it also good to have young women let the boys know that they like it when the boys care for their clothing. A little positive peer pressure can go a long way. I remember when in high school a young lady paid a compliment on my clothing, and it was surprising to see how much more important my dress became to me after that ;)
I have no interest in suppression of women, or in making them subservient or of lesser importance. I think modesty in its proper setting elevates and ennobles manhood and womanhood It shows the appreciation of their innate value, and wanting to preserve and protect it.
Cheers to the beauty and joy of modesty!
Monday, July 30, 2012
Honey Bees
Beekeeping is sweet. Twenty years ago, we had up to 10 hobby hives at one time. Back then we got started with bees by capturing free swarms to start our hives. We are planning to work with bees again, a first for our northern homestead. So we revive the hobby again. Double sweet.
The process of working with animals is fascinating. We enjoyed searching out the queen bee and watching the entire colony interactions. We even created an observation hive, a three frame hive in our dining room. It was glassed on both sides, and one frame thick, so you could easily watch the bees and the queen.
2012 Experience
Today (April 24) we installed our bees, and they are doing great. The weather was sunny and temps in the lower 60's. We got a call at 7 am that the truck was 30 mins out, and to meet them at our pickup location. We got there just before the box truck pulling a trailer eased in behind us. They had driven non-stop from Florida and the vehicle was packed full of bees. Our stop was the fourth for them, and they had two more to go.
We had ordered 2 nucs, and they were at the top of the stack. The rest were packages of bees in the load. We helped them unload the 50 packages for this dropoff location, and then gently headed home with 50,000 girls in the back seat.
Normally when you install a package of bees, they are calm, as they do not have a "hive" to protect. They are just happy to get out of the box and into a normal hive. I found that installing a nuc is not the same. I spritzed them with sugar water, but in retrospect I think some smoke would have been better. The 5 frames of the nuc came out ok with a frame extractor, and I was careful to not roll and kill the bees as I extracted the frames and installed them into their new home. You set the frame in with some space to spare, and then slide it up close to the nearby frame. We were able to locate the queen bee in both hives, so that was nice to be able to see them! The nucs have a good brood pattern, and we saw several new workers hatching out as we inspected the frames.
When the nuc box was empty of frames there remained several hundred bees hanging inside. I gave the box a rap onto the hive box to knock them out. That just made them MAD. They came out with stingers barred. I was expecting very docile behavior, but these guard bees meant serious business. They did have an active hive to defend. Within moments we were all running and wishing we had tightened down the access points of our clothing. I had bees inside my bee hat and veil, inside my shirt pockets and inside my shirt. Our dog was a victim as well. She was standing nearby and soon was a bee target, and she ran with good reason as we all retreated. The wiser, we approached the second hive with more preparation and better clothing.
One of the nucs was bulging at the seams with bees, the other was mostly full, but not crowded. As soon as we set them up the workers were out and looking for pollen and nectar. There was no wasting time looking around at the "new house." They got to work! We could see streams of bees coming in with pollen sacs on their back legs loaded with bright yellow pollen. It is fun to see them have something local to enjoy on their first day in their new home.
July 4, 2012 update: The bees have been busy! We have added a hive body a little faster than 1 per month. We are now at 4 hive bodies on each hive, and the bees are bringing in loads of nectar. We have entire hive bodies full of capped honey. In the two upper bodies on each hive, we have placed 9 frames, and spaced them evenly with a 9-frame spacer tool. This allows the bees to draw the comb out a little longer per frame. This is beneficial for honey extraction, as there are 2 less sides to uncap per hive body for the same total volume of honey obtained.
July 26, 2012 update: The bees have filled all four large hive bodies. Rather than go up and make the stack 5 bodies tall, I chose to remove some of the super honey frames, and replace them with new frames of un-drawn foundation. We have pulled 24 full sized frames, capped on both sides of honey. It is a lot of honey, and we will be extracting this first batch in a few days. The honey flow seems to be continuing even through the heat and drought. Lots of bee activity each day!
July 30, 2012 update: We extracted the honey from the 24 full sized frames using our 9 frame radial extractor, and obtained 12 gallons of honey.
Colony members
 Hive construction
I have removed swarms from hollow logs and under houses. Bees can enter a hole and build a hive within a wall (making extraction difficult.) While bees can make their own home, it is more convenient for them to have the bee keeper construct a hive to their exact preferences. Bee hives, or boxes, have a specific size, and are slotted to hold the frames, suspended from a ledge at the top of the box. This gives the bees free access to the frames. The frames are "started" with a foundation sheet, imprinted with the honey comb pattern, and it jump starts the bees into comb production in an organized way.
Bees rear their young, and store honey and pollen in the wax comb, so it is a wonderful multipurpose structure.
I found it easier to purchase tools and hive parts and assemble the hives myself. If you have wood working tools, I don't think it would be difficult to construct the wood parts from scratch, but I would still suggest following the time proven patterns that bees prefer. If you wanted a home based business, producing hive parts could be a viable small income option.
The bee box is made of wood, painted on the outside and left bare on the inside. The bee box comes in three heights, the 12" box and the 6" super (or honey box) and I have seen reference to an even smaller height box. I used 12" boxes through out my bee system. A hive body full of honey (wood parts plus honey) can weigh 80 lbs. The 6" super would weigh in at around 40 lbs, and would be easier to lug around. My view was that if I can handle the weight, it would be half the work and parts, to use the full size or "deep" frames for both brood as well as honey production. The full sized frames yield 40-50 lbs of extracted honey per hive body or super. This yield equals 4-5 gallons of extracted honey per super.
For overwintering, a hive in the north where we live should have two deep hive boxes of honey stores, and they should be checked periodically on warm winter days to make sure they are not running low on honey. It is possible to feed your bees sugar water or sugar candy to keep them alive through the winter.
Protective clothing
You need to assume that you will be stung when working with bees. Generally they don't sting, especially if you do not rush and have a calm spirit when you work with your hives. Bees do crawl, and when they get under your clothing, it can create some excitement. As you move around, you may start to squeeze a bee, who likely was not in the best mood to begin with, resulting in a sting. Excluding the bees from clothing is a good plan. I found them rarely able to sting through denim. I would wear one pair of jeans, double socks, and rubber band the socks outside to the jean legs. Long sleeve flannel shirt, or double shirt. If it was cool I would wear a bulky sweat shirt. Their stingers are not all that long, so you just need to hold them away from your skin a bit. Bee gloves and a bee hat exclude them nicely.
Tools
Start up costs
It has been several years since I have worked with bees. I have kept my deep boxes, but other than that, I am basically starting over. When we moved prior, I sold all my frames and bees. My smoker was rusted through, and by bee hat and gloves destroyed by mice. I just placed my order for the needed frames and equipment, totaling around $500.00. I am planning on purchase of 2 nucleus hives at $100 each. If I was starting from scratch, I would guess it would total close to $1000. With that investment, you can start with two active hives, and grow with not much more cost up to 10 hives. In a good year, a hive could offer $400 value in honey.
Time required
Bees generally do very well just being left alone. There are some cases where it is good to know what is going on, but it does not take a lot of time to assess how the hive is doing. If the hive fills all the available space with honey and they need more space for the flow of nectar into the hive, they will prepare to swarm. If left to their own devices, they will swarm, and you will loose a strong productive hive. You would check for disease, pests, and queen cells signaling a coming swarm. A good management practice is to inspect your hives every two weeks. This should only take about 15 minutes per hive. For two hives, that could be an hour a month.
Extracting honey takes more time, but wow, you are richly paid for that time investment! With a few hives, you can definitely work with bees as a hobby. You don't have to be on a strict schedule, and they are busy working while you leave them to their own activities.
Bee Facts
Pests
Varroa mites to a bee are like fleas on a dog. Only the mites do more damage to the overall health of a hive if they get out of control. They are flat, saucer shaped red colored insects that bite under the honey bee scales. Watching the bees it is obvious that the bee is bothered by the mites presence. The bees are sometimes able to flick the mites off, and they fall to the bottom of the hive. There are screens that you can place in the bottom of the hive that will allow the mites to fall through to a sticky pad, trapping them from climbing back up to find a new bee victim, but the screen keeps the bees away from the sticky pad. Treat with 1 cup of powdered sugar all over the tops of the frames (1 cup per deep box). Perform this treatment exactly once a week for three weeks. The bees become covered with this dusty sugar, and so in an effort to clean themselves up, they also clean off the mites.
To address the tracheal mite naturally use a grease patty in the hive. Mix 2 parts powdered sugar with one part Crisco vegetable shortening. You can add a bit of honey-b-healthy or lemon grass oil extract. Compact this mixture between two sheets of wax paper to the size of a hamburger patty and lay on the top bar of each deep brood body. The grease patty cuts the tracheal mite population by disrupting the mite life cycle. It makes it more difficult to for mites to pass from older bees to younger bees either physically or by masking the scent of younger bees. It is ok to leave grease patties in the hive year round.
I once found a mouse carcass in the bottom of a hive. It appeared stung to death, and was encased in the bees propolus glue. Pests best not mess with a strong hive.
Consider working with bees. You will find is a rewarding study, and oh so sweet!
Resources
The process of working with animals is fascinating. We enjoyed searching out the queen bee and watching the entire colony interactions. We even created an observation hive, a three frame hive in our dining room. It was glassed on both sides, and one frame thick, so you could easily watch the bees and the queen.
2012 Experience
Today (April 24) we installed our bees, and they are doing great. The weather was sunny and temps in the lower 60's. We got a call at 7 am that the truck was 30 mins out, and to meet them at our pickup location. We got there just before the box truck pulling a trailer eased in behind us. They had driven non-stop from Florida and the vehicle was packed full of bees. Our stop was the fourth for them, and they had two more to go.
We had ordered 2 nucs, and they were at the top of the stack. The rest were packages of bees in the load. We helped them unload the 50 packages for this dropoff location, and then gently headed home with 50,000 girls in the back seat.
.JPG) |
| Two boys watching the bees. How fun! |
When the nuc box was empty of frames there remained several hundred bees hanging inside. I gave the box a rap onto the hive box to knock them out. That just made them MAD. They came out with stingers barred. I was expecting very docile behavior, but these guard bees meant serious business. They did have an active hive to defend. Within moments we were all running and wishing we had tightened down the access points of our clothing. I had bees inside my bee hat and veil, inside my shirt pockets and inside my shirt. Our dog was a victim as well. She was standing nearby and soon was a bee target, and she ran with good reason as we all retreated. The wiser, we approached the second hive with more preparation and better clothing.
One of the nucs was bulging at the seams with bees, the other was mostly full, but not crowded. As soon as we set them up the workers were out and looking for pollen and nectar. There was no wasting time looking around at the "new house." They got to work! We could see streams of bees coming in with pollen sacs on their back legs loaded with bright yellow pollen. It is fun to see them have something local to enjoy on their first day in their new home.
July 4, 2012 update: The bees have been busy! We have added a hive body a little faster than 1 per month. We are now at 4 hive bodies on each hive, and the bees are bringing in loads of nectar. We have entire hive bodies full of capped honey. In the two upper bodies on each hive, we have placed 9 frames, and spaced them evenly with a 9-frame spacer tool. This allows the bees to draw the comb out a little longer per frame. This is beneficial for honey extraction, as there are 2 less sides to uncap per hive body for the same total volume of honey obtained.
July 26, 2012 update: The bees have filled all four large hive bodies. Rather than go up and make the stack 5 bodies tall, I chose to remove some of the super honey frames, and replace them with new frames of un-drawn foundation. We have pulled 24 full sized frames, capped on both sides of honey. It is a lot of honey, and we will be extracting this first batch in a few days. The honey flow seems to be continuing even through the heat and drought. Lots of bee activity each day!
July 30, 2012 update: We extracted the honey from the 24 full sized frames using our 9 frame radial extractor, and obtained 12 gallons of honey.
Colony members
- Queen - her primary duty is to lay eggs, around 1500 a day. She also secretes pheremones that keep the workers happy. Queen bees can live for 3-7 years. A queen will emerge from a queen cell in 16 days.
- Drones - the drones only duty is to fly out and mate with a queen. I believe queens need only mate once. Drones take 24 days to emerge from the drone cell.
- Workers - as the name implies, the workers do all of the work. They are non-fertile female bees and they have a very structured life from the moment they emerge from their cocoons. Throughout their life they will serve as nursery bees, construction bees, storage bees, guard bees and foraging bees. They live, on average, only 20-30 days from the time they emerge from cocoon. The time from egg to capping is 9 days, and the bee will emerge in a total of 21 days.

I have removed swarms from hollow logs and under houses. Bees can enter a hole and build a hive within a wall (making extraction difficult.) While bees can make their own home, it is more convenient for them to have the bee keeper construct a hive to their exact preferences. Bee hives, or boxes, have a specific size, and are slotted to hold the frames, suspended from a ledge at the top of the box. This gives the bees free access to the frames. The frames are "started" with a foundation sheet, imprinted with the honey comb pattern, and it jump starts the bees into comb production in an organized way.
Bees rear their young, and store honey and pollen in the wax comb, so it is a wonderful multipurpose structure.
I found it easier to purchase tools and hive parts and assemble the hives myself. If you have wood working tools, I don't think it would be difficult to construct the wood parts from scratch, but I would still suggest following the time proven patterns that bees prefer. If you wanted a home based business, producing hive parts could be a viable small income option.
The bee box is made of wood, painted on the outside and left bare on the inside. The bee box comes in three heights, the 12" box and the 6" super (or honey box) and I have seen reference to an even smaller height box. I used 12" boxes through out my bee system. A hive body full of honey (wood parts plus honey) can weigh 80 lbs. The 6" super would weigh in at around 40 lbs, and would be easier to lug around. My view was that if I can handle the weight, it would be half the work and parts, to use the full size or "deep" frames for both brood as well as honey production. The full sized frames yield 40-50 lbs of extracted honey per hive body or super. This yield equals 4-5 gallons of extracted honey per super.
For overwintering, a hive in the north where we live should have two deep hive boxes of honey stores, and they should be checked periodically on warm winter days to make sure they are not running low on honey. It is possible to feed your bees sugar water or sugar candy to keep them alive through the winter.
Protective clothing
You need to assume that you will be stung when working with bees. Generally they don't sting, especially if you do not rush and have a calm spirit when you work with your hives. Bees do crawl, and when they get under your clothing, it can create some excitement. As you move around, you may start to squeeze a bee, who likely was not in the best mood to begin with, resulting in a sting. Excluding the bees from clothing is a good plan. I found them rarely able to sting through denim. I would wear one pair of jeans, double socks, and rubber band the socks outside to the jean legs. Long sleeve flannel shirt, or double shirt. If it was cool I would wear a bulky sweat shirt. Their stingers are not all that long, so you just need to hold them away from your skin a bit. Bee gloves and a bee hat exclude them nicely.
Tools
- Hive tool (web order)
- Bee smoker (web order)
- Bee brush (web order)
Start up costs
It has been several years since I have worked with bees. I have kept my deep boxes, but other than that, I am basically starting over. When we moved prior, I sold all my frames and bees. My smoker was rusted through, and by bee hat and gloves destroyed by mice. I just placed my order for the needed frames and equipment, totaling around $500.00. I am planning on purchase of 2 nucleus hives at $100 each. If I was starting from scratch, I would guess it would total close to $1000. With that investment, you can start with two active hives, and grow with not much more cost up to 10 hives. In a good year, a hive could offer $400 value in honey.
Time required
Bees generally do very well just being left alone. There are some cases where it is good to know what is going on, but it does not take a lot of time to assess how the hive is doing. If the hive fills all the available space with honey and they need more space for the flow of nectar into the hive, they will prepare to swarm. If left to their own devices, they will swarm, and you will loose a strong productive hive. You would check for disease, pests, and queen cells signaling a coming swarm. A good management practice is to inspect your hives every two weeks. This should only take about 15 minutes per hive. For two hives, that could be an hour a month.
Extracting honey takes more time, but wow, you are richly paid for that time investment! With a few hives, you can definitely work with bees as a hobby. You don't have to be on a strict schedule, and they are busy working while you leave them to their own activities.
Bee Facts
- It takes 12 bees their entire lives to produce one teaspoon of honey. (web)
- A honey bee can fly up to 15 miles per hour. (web)
- A bee will visit 50 - 100 flowers per foraging flight. (web)
- Bees will visit two million flowers and fly 55,000 miles to produce one pound of honey. (web)
- Bees generally forage within 2 miles of their hive, but could travel further if needed. (web)
- A teaspoon of honey contains 22 calories (sugar = 18), and a table spoon of honey contains 64 calories (sugar = 46). (web)
- The queen will lay 1,000 - 2,000 eggs per day with warm temperatures and honey flow. (web)
- A strong hive will have 70,000 - 100,000 bees. (web)
- There are around 3,300 individuals in a pound of bees. (web)
- Bees will fly 150,000 miles, the equivalent of 6 times around the earth, to produce one pound of beeswax. (web)
Pests
Varroa mites to a bee are like fleas on a dog. Only the mites do more damage to the overall health of a hive if they get out of control. They are flat, saucer shaped red colored insects that bite under the honey bee scales. Watching the bees it is obvious that the bee is bothered by the mites presence. The bees are sometimes able to flick the mites off, and they fall to the bottom of the hive. There are screens that you can place in the bottom of the hive that will allow the mites to fall through to a sticky pad, trapping them from climbing back up to find a new bee victim, but the screen keeps the bees away from the sticky pad. Treat with 1 cup of powdered sugar all over the tops of the frames (1 cup per deep box). Perform this treatment exactly once a week for three weeks. The bees become covered with this dusty sugar, and so in an effort to clean themselves up, they also clean off the mites.
To address the tracheal mite naturally use a grease patty in the hive. Mix 2 parts powdered sugar with one part Crisco vegetable shortening. You can add a bit of honey-b-healthy or lemon grass oil extract. Compact this mixture between two sheets of wax paper to the size of a hamburger patty and lay on the top bar of each deep brood body. The grease patty cuts the tracheal mite population by disrupting the mite life cycle. It makes it more difficult to for mites to pass from older bees to younger bees either physically or by masking the scent of younger bees. It is ok to leave grease patties in the hive year round.
I once found a mouse carcass in the bottom of a hive. It appeared stung to death, and was encased in the bees propolus glue. Pests best not mess with a strong hive.
Consider working with bees. You will find is a rewarding study, and oh so sweet!
Resources
- Bee Keeping Lessons (web)
- Michigan Beekeepers (web)
- Mann Lake bee sales (web, catalog)
- Long Lane Honey Bee Farms, Fairmount, IL (web)
- Candy board instructions (pdf)
- Making Soap with Beeswax and Honey (web), Basic Soap Recipe (pdf)
- Tracheal mites info (pdf)
Thursday, May 10, 2012
Creating an Orchard
Fruit is wonderful, flavorful, and healthful! If you get fruit varieties suited to your climate, you will have a much easier return on the investment of time as compared with vegetables. Fruit trees do not have to be coaxed to life each year.
Just as in my article: Creating a Garden, you have to prepare the ground of your orchard before you plant. Take special care to add mineral nutrients to make your soil a perfect location for a tree to thrive. In addition to these suggestions, I want to provide some planting guidelines and spacing suggestions for your orchard.
Orchard considerations
Propagation
Spacing
I have enjoyed walking through surrounding orchards, and observing the pruning methods, and orchard layout. The spacing would depend on the type of root stock which determines the size of the adult tree: dwarf, semi-dwarf or regular.
Fruit trees need a fair amount of space. For the small orchard like ours, I would assume you will be looking for semi-dwarf root stock varieties (where possible.) I do not suggest you work with dwarf stock unless you really have no room for any trees. Dwarf root stock stunts the tree so badly, that you have tree health issues ongoing. We chose to lay our orchard out on a 15 foot grid. This will be just right for the semi-dwarf trees, and a bit small for the regular sized cherry trees. We decided to place the cherry's on the north side of the orchard plot so as they grow they will not shade the other trees too much. Some full sized apple trees could use a diameter of 25 feet, so know your root stock, and plan your spacing accordingly.
Orchard Planting 2012
When looking to plant our orchard, we decided to focus on trees that were hardy and disease resistant. We wanted trees that would offer a low chemical spray requirement. Our selections are as follows:
Orchard Update 2016
The Apple trees and peach trees had their first real year last season. This year the peaches have come on thick, and it has taken days to thin out the thousands of extra peaches. The peach tree borers have been hard on the peaches. Several trees are affected, and it seems also that some of the early limb angles were not enough to prevent bark being impacted in the growing tree bark, making for what looks like very weak crotches. I will have to support these, and watch this closer with any future trees planted.
In May 2016, I planted three more threes on the west end of the rows. This will make the three rows from North to South:
1) Royalton Sweet Cherry, Sugar/German Plum, Mount Royal Plum, White Gold Sweet Cherry, Chinese Apricot, (dying) Stellar Autumstar
2) SunHaven Peach, Contender, Cresthaven, Glowhaven, Stellar Glowingstar, Stellar Blazingstar
3) Liberty Apple, Crimson Crisp, Galarina, Goldrush x2, Gala-like Resista
Orchard Update 2018
The tree layout for 2018 is by row:
Tree planting principles
Initial Pruning and Training
Mail order trees may be initially pruned for you. If you buy local, the initial pruning will not be done, and you must prune the trees right after planting, so the branches and leaves are cut back to the level the disturbed roots can support. Bare root trees must be pruned to survive. How you prune depends on the type of tree. You want to prune to select the apical bud that will grow outward from the tree, rather than inward to the center.
On almost all fruit, it is important to train for wide crotch angles of at least 45 degrees. This measurement is from the trunk to the branch angle. A narrow crotch angle is weaker and more prone to break under the fruit crop load. Good healthy trees have crotch angles of 45 to 90 degrees.
Resources
Just as in my article: Creating a Garden, you have to prepare the ground of your orchard before you plant. Take special care to add mineral nutrients to make your soil a perfect location for a tree to thrive. In addition to these suggestions, I want to provide some planting guidelines and spacing suggestions for your orchard.
Orchard considerations
- Some trees need partners to pollinate well. Some trees are male and others female, and these surely need pairs to be successful.
- There are different tree root stocks which will help control the size of the tree. You need to plan your orchard spacing with this information in mind.
- How you plan to cultivate weeds, irrigate and harvest your fruit may influence your inter-tree spacing within the row, and the space between the rows. Orchards take a lot of ground, so plan out the grid and prepare the holes before you purchase trees.
- If you are wanting to go organic, or at least avoid toxic chemicals as much as possible, consider purchasing disease resistant trees. (See this reference also.)
- Orchards need attention at specific times of the year. An orchard is not something you plant and forget till harvest. There is something to do each month and some months, there are a lot of things to do. You need to be able to devote time to the trees for watering, training, insect control and pruning.
Propagation
- You may want to propagate free stock. Any tree cultivar less than 17 years in production may be under trademark, and should not be propagated without permission and payment of royalty.
- Starting fruit trees is not hard. Root stocks are selected for their vigorous growth. The grafted stock, or scion is also easy to grow. With one root and one scion tree source, you could have hundreds of grafted trees in a period of a few years.
- Some trees and bush varieties grow directly on their own root stocks, and are easy to self propagate and share with others.
- Vines, berries, and all of the trees are readily propagated. Find examples to take terminal clippings from. The normal pruning process will yield a large quantity of new starts if wanted.
.JPG) |
| Apple tree just after planting. |
I have enjoyed walking through surrounding orchards, and observing the pruning methods, and orchard layout. The spacing would depend on the type of root stock which determines the size of the adult tree: dwarf, semi-dwarf or regular.
Fruit trees need a fair amount of space. For the small orchard like ours, I would assume you will be looking for semi-dwarf root stock varieties (where possible.) I do not suggest you work with dwarf stock unless you really have no room for any trees. Dwarf root stock stunts the tree so badly, that you have tree health issues ongoing. We chose to lay our orchard out on a 15 foot grid. This will be just right for the semi-dwarf trees, and a bit small for the regular sized cherry trees. We decided to place the cherry's on the north side of the orchard plot so as they grow they will not shade the other trees too much. Some full sized apple trees could use a diameter of 25 feet, so know your root stock, and plan your spacing accordingly.
Orchard Planting 2012
When looking to plant our orchard, we decided to focus on trees that were hardy and disease resistant. We wanted trees that would offer a low chemical spray requirement. Our selections are as follows:
- Pear: Moonglow, Starking Delicious
- Apple: Freedom, Crimson Crisp, Galarina, Goldrush x2, Gala-like Resista
- Peach: SunHaven, Contender, Cresthaven, Glowhaven, Stellar Glowingstar, Stellar Blazingstar, Stellar Autumstar
- Plum: Sugar/German, Mount Royal
- Cherry: White Gold Sweet, Black Gold, Stella
The Apple trees and peach trees had their first real year last season. This year the peaches have come on thick, and it has taken days to thin out the thousands of extra peaches. The peach tree borers have been hard on the peaches. Several trees are affected, and it seems also that some of the early limb angles were not enough to prevent bark being impacted in the growing tree bark, making for what looks like very weak crotches. I will have to support these, and watch this closer with any future trees planted.
In May 2016, I planted three more threes on the west end of the rows. This will make the three rows from North to South:
1) Royalton Sweet Cherry, Sugar/German Plum, Mount Royal Plum, White Gold Sweet Cherry, Chinese Apricot, (dying) Stellar Autumstar
2) SunHaven Peach, Contender, Cresthaven, Glowhaven, Stellar Glowingstar, Stellar Blazingstar
3) Liberty Apple, Crimson Crisp, Galarina, Goldrush x2, Gala-like Resista
Orchard Update 2018
The tree layout for 2018 is by row:
- 1: Pear: Moonglow, Moonglow
- 2: Pear: Starking Delicious, Starking Delicious
- 3: Apple: Freedom, Crimson Crisp, Galarina, Goldrush x2, Gala-like Resista (not doing well)
- 4: Peach: SunHaven, Contender, Cresthaven, Glowhaven, Cresthaven, Cresthaven
- 5: Royalton Sweet Cherry, Sugar/German Plum, Mount Royal Plum, White Gold Sweet Cherry, Black Gold Cherry (new), Stella Cherry
In the perspective of time, I would not plant any apple trees again (in my area). The diseases and pests make organic apples not worth eating (in my opinion), and conventional apples are readily available in our area.
Tree planting principles
- For maximum production, trees need deep soil ~ 3 feet deep.
- Many areas have a clay or hardpan under the surface, and this needs to be broken up and penetrated so the roots can develop and allow for proper drainage. Prevent a hard layer or clay glaze around the hole you dig. You want the roots to penetrate out of the hole into the ground beyond.
- When preparing the planting hole, care should be taken to not include so much mulch that the tree settles and the crown sinks below the surface of the soil line. The tree needs to be planted at the same depth as it was grown at.
- Do not let the roots dry out in the planting process. If bare root trees can not be immediately planted, the roots should be protected from drying out, perhaps even temporarily being planted.
- Add to the hole: mulch (leaf mould), top soil and the soil from the hole. Add some kelp powder or a small amount of sea salt for micro-nutrients. Do not fertilize a new tree.
- Deep in the hole, place a plastic pot upside down, a section of drainage tubing, or some object which can form an air / water cavity. This is not as needed in well drained soils such as sand.
- Add some rocks deep into the hole, but not a solid rock layer.
- Mound up the soil contents in the center of the hole, preparing a base for the tree roots to rest on.
- In windy and exposed areas, consider placing a large rock on top of the mound, around which with tree roots could rest and grow. The rock would serve as an anchor for the tree.
- Plant the tree to original soil depth, filling in around it with the soil mixture already prepared.
- Plant the graft union notch to the north east to help prevent sunburn on the graft.
- The soil line around the tree should be 1-2 inches above the surrounding soil. This is a slight mound around the tree.
- Water the tree with 5 gallons of water after planting to help remove excess air from the roots, and provide moisture.
- If the soil is heavy loam or clay, care should be taken to not drown the roots with too much water. Mixing soils as mentioned should remove this danger because of the mixture of the top soil and compost into the planting mix.
- Water the tree regularly (2 times a week may be a minimum in hot / dry weather.) The tree must be nursed to life and its roots will not be able to stand much stress. Make a circular watering basin around the tree at the perimeter of the roots and beyond to water the planting area. Do not have the water pool around the trunk.
- Mulch the tree 3 feet around the trunk to prevent competing weeds and hold moisture. The mulch can be wood chips or other mulch material, around 6 inches in depth. Do not mulch right up to the trunk as this could encourage crown rot and harbor pests that could damage the tree.
Initial Pruning and Training
Mail order trees may be initially pruned for you. If you buy local, the initial pruning will not be done, and you must prune the trees right after planting, so the branches and leaves are cut back to the level the disturbed roots can support. Bare root trees must be pruned to survive. How you prune depends on the type of tree. You want to prune to select the apical bud that will grow outward from the tree, rather than inward to the center.
On almost all fruit, it is important to train for wide crotch angles of at least 45 degrees. This measurement is from the trunk to the branch angle. A narrow crotch angle is weaker and more prone to break under the fruit crop load. Good healthy trees have crotch angles of 45 to 90 degrees.
Resources
- Choose trees that will produce in your area (web)
- Getting started with fruit production (web)
- How to grow organic peaches (web)
- Planting and pruning guide (pdf)
- Planting and care of young fruit trees (pdf)
Tuesday, March 13, 2012
Blueberries
Blueberries have gotten some good press about their health giving properties. As perennials, small fruits and berries will perform year after year without the startup work required for vegetables. Since we live in the north, blueberry fields are common in our area, and we have grown to love them.
Our plan is to plant 10-20 blue berry plants this spring. The biggest challenge we face is that our soils are alkaline, and as noted below, these plants love acidic soils. This will be a major challenge to change the soil pH around this growing area.
Growing preferences
Blueberries come from bushy plants that love boggy and wet areas. They do not want to be covered with water, but they do like to keep their roots moist. We have a wet area along the side of our field that we think would be ideal for our new blue berry plants.
They also like acidic soil, as is found in a bog. Your target pH is 4.5 to 5.5, and most soil will need amendments to assist in the lowering of the pH. Amend the soil to a depth of 14 inches by two feet wide. Pine needles, pine bark, elemental sulfur, ammomium sulfate and peat moss can lower the pH in your garden bed that will hold your blue berries. Canadian sphagnum peat moss has a pH of 3.0 to 4.5 making it an ideal amendment for blueberries. If necessary lower pH and supply nitrogen by adding 1 lb. of ammonium sulfate commercial fertilizer to 100 feet per inch depth of sawdust. Organic growers can use elemental sulfur and cottonseed meal or feather meal. It takes several months to a year for sulfur to lower the pH. Prepare blueberry planting site well in advance for best results.
Varieties
Follow this link for a beautiful chart of blueberry varieties. (web)
Our plan is to plant 10-20 blue berry plants this spring. The biggest challenge we face is that our soils are alkaline, and as noted below, these plants love acidic soils. This will be a major challenge to change the soil pH around this growing area.
Growing preferences
Blueberries come from bushy plants that love boggy and wet areas. They do not want to be covered with water, but they do like to keep their roots moist. We have a wet area along the side of our field that we think would be ideal for our new blue berry plants.
They also like acidic soil, as is found in a bog. Your target pH is 4.5 to 5.5, and most soil will need amendments to assist in the lowering of the pH. Amend the soil to a depth of 14 inches by two feet wide. Pine needles, pine bark, elemental sulfur, ammomium sulfate and peat moss can lower the pH in your garden bed that will hold your blue berries. Canadian sphagnum peat moss has a pH of 3.0 to 4.5 making it an ideal amendment for blueberries. If necessary lower pH and supply nitrogen by adding 1 lb. of ammonium sulfate commercial fertilizer to 100 feet per inch depth of sawdust. Organic growers can use elemental sulfur and cottonseed meal or feather meal. It takes several months to a year for sulfur to lower the pH. Prepare blueberry planting site well in advance for best results.
Varieties
Follow this link for a beautiful chart of blueberry varieties. (web)
Elliott has one of the highest levels of antioxidants of
all blueberry varieties.
Once picked Elliott has a storage life of up to 12 weeks. (web)
Varieties we have planted in 2012, and updated in 2014 replacing a dead Bluecrop.
Duke x1
Bluecrop x9
Blue Ray x10
Earliblue x10
Ka-Bluey x5
Chandler x5
Planting and soil preparation
"Select a sunny location with well-drained soil that is free of weeds and is well-worked. It's best to locate your blueberry plants in an area where irrigation is readily available as best results will be achieved by keeping the root zone moist throughout the growing season.
"Blueberries prefer acidic soils. A fail-safe way to grow blueberries in almost any soil is to incorporate peat moss into the planting medium. For planting directly in the ground, work up a planting area approximately 2½ feet in diameter and 2 foot deep for each plant. Remove 1/3 to 1/2 of the soil. Add an equal amount of pre-moistened peat moss and mix well. (One 4 cubic foot compressed bale will usually be sufficient for 2-4 plants.)" (web)
Space your bushes from 4 to 6 feet apart with 7 to 10 feet between rows. Commercial farms space the rows 10 feet apart which is large enough for tractor access down the row. The home gardener can plant them 3 to 4 feet apart in any arrangement fitting the home landscape. Set at the same depth plants grew in container or ground. Planting too deeply will smother the roots. Little or no pruning is needed for the first two years except to remove broken or rubbing branches. Strip off all blossoms and fruits until the plant is well established (36 to 42 inches tall).
Mulch
Blueberries require mulch. For the first year mulch with fir, pine, or hemlock well rotted sawdust extending out 2 feet around plant to a depth of 3 inches so roots will not grow up into the mulch. After the first year increase mulch to a depth of 6 inches mounded around the crown. As plants mature extend the mulch out to the drip line. Mulch will gradually break down to help feed the plant and supply the high rate of organic matter blueberries need. More important, mulch provides a cool root run and conserves moisture, both requirements for blueberries. Other materials may be used as mulch such as composted pine needles or shredded leaves. General compost made from vegetable materials may be too high in pH for blueberries. Fresh grass clippings can heat up and damage surface roots. (web)
Planting History 2012
We ordered one Ka-Bluey plant online via a sale, and 4 more from another online site. The 30 other plants were picked up at a wholesaler, at a much better per unit price. The single Ka-Bluey came in the mail a week before we had scheduled to get the other plants from the wholesaler, so we put it in the ground on April 2. We were gone to a retreat for the next week, and there were some cold nights while we were gone. We watered well, and a friend also watered the plant, but when we returned, the once green leaves were brown red. I thought it was dying. Looking this up on the Internet, I see this is common for plants that were used to the warm, being transplanted into the cold of early spring to have the leaves turn red. This is the normal coinsurance in the fall due to cold temps. I hope the plant pulls through. Since we have been back to the homestead, I have protected the plant by covering it with an overturned bucket on the nights of frost danger.
We have waited to plant any additional plants till the 10 day forecast does not include the chance of frost. Hopefully we will plant the rest of the blueberry plants this Friday, April 13. Since our soil is alkaline, I wanted to dig a large hole and amend the soil with ag sulfur deeply. With the backhoe, I dug a trench 2 feet wide and about 3 feet deep. I will mix peat, ag sulfur, and compost and return the soil to the trench, and then will plant the blueberries with a generous amount of peat around its roots (say 2 shovels full).
We are planting the blueberries in 2 rows of 20 plants. We are setting our plants 4 feet apart within the row, and the rows 7 feet apart. We are not planning to need to drive the tractor down the row, and can therefore save the space, and have the rows closer together.
Pruning
"One of the biggest mistakes home gardeners make with their blueberries is lack of pruning. Aggressive, annual pruning will result in healthier, more vigorous plants and more prolific fruit production. Here are some simple tips:
Propagation
When you prune your blueberry plants, remember to save your clippings to start new plants. Clip the root end of the swig at an angle, and the top cut flat. Dip the angle cut end in rooting hormone, and plant in growth medium, and keep the atmosphere moist.
When roots have developed, plant in a location where you can protect it through the first winter. Some suggest building a mimi-greenhouse of plastic, straw and more plastic. This would sandwich the straw between the plastic to keep the straw warm, and preserve the thermal blanket effect.
Resources
Varieties we have planted in 2012, and updated in 2014 replacing a dead Bluecrop.
Duke x1
Bluecrop x9
Blue Ray x10
Earliblue x10
Ka-Bluey x5
Chandler x5
Planting and soil preparation
"Select a sunny location with well-drained soil that is free of weeds and is well-worked. It's best to locate your blueberry plants in an area where irrigation is readily available as best results will be achieved by keeping the root zone moist throughout the growing season.
"Blueberries prefer acidic soils. A fail-safe way to grow blueberries in almost any soil is to incorporate peat moss into the planting medium. For planting directly in the ground, work up a planting area approximately 2½ feet in diameter and 2 foot deep for each plant. Remove 1/3 to 1/2 of the soil. Add an equal amount of pre-moistened peat moss and mix well. (One 4 cubic foot compressed bale will usually be sufficient for 2-4 plants.)" (web)
Space your bushes from 4 to 6 feet apart with 7 to 10 feet between rows. Commercial farms space the rows 10 feet apart which is large enough for tractor access down the row. The home gardener can plant them 3 to 4 feet apart in any arrangement fitting the home landscape. Set at the same depth plants grew in container or ground. Planting too deeply will smother the roots. Little or no pruning is needed for the first two years except to remove broken or rubbing branches. Strip off all blossoms and fruits until the plant is well established (36 to 42 inches tall).
Mulch
Blueberries require mulch. For the first year mulch with fir, pine, or hemlock well rotted sawdust extending out 2 feet around plant to a depth of 3 inches so roots will not grow up into the mulch. After the first year increase mulch to a depth of 6 inches mounded around the crown. As plants mature extend the mulch out to the drip line. Mulch will gradually break down to help feed the plant and supply the high rate of organic matter blueberries need. More important, mulch provides a cool root run and conserves moisture, both requirements for blueberries. Other materials may be used as mulch such as composted pine needles or shredded leaves. General compost made from vegetable materials may be too high in pH for blueberries. Fresh grass clippings can heat up and damage surface roots. (web)
Planting History 2012
We ordered one Ka-Bluey plant online via a sale, and 4 more from another online site. The 30 other plants were picked up at a wholesaler, at a much better per unit price. The single Ka-Bluey came in the mail a week before we had scheduled to get the other plants from the wholesaler, so we put it in the ground on April 2. We were gone to a retreat for the next week, and there were some cold nights while we were gone. We watered well, and a friend also watered the plant, but when we returned, the once green leaves were brown red. I thought it was dying. Looking this up on the Internet, I see this is common for plants that were used to the warm, being transplanted into the cold of early spring to have the leaves turn red. This is the normal coinsurance in the fall due to cold temps. I hope the plant pulls through. Since we have been back to the homestead, I have protected the plant by covering it with an overturned bucket on the nights of frost danger.
.JPG) |
| 10 Bluecrop ready for planting |
We are planting the blueberries in 2 rows of 20 plants. We are setting our plants 4 feet apart within the row, and the rows 7 feet apart. We are not planning to need to drive the tractor down the row, and can therefore save the space, and have the rows closer together.
Pruning
"One of the biggest mistakes home gardeners make with their blueberries is lack of pruning. Aggressive, annual pruning will result in healthier, more vigorous plants and more prolific fruit production. Here are some simple tips:
- Pruning is best done in the spring before the leaves come out.
- Remove low growth around the base.
- Remove the dead wood, leaving bright colored lateral branches. Cut out any short, discolored branches.
- Continue pruning until you have removed 1/3 to 1/2 of the wood out your plants each year. Remember, this will promote growth and berry production so prune away!" (web)
Propagation
When you prune your blueberry plants, remember to save your clippings to start new plants. Clip the root end of the swig at an angle, and the top cut flat. Dip the angle cut end in rooting hormone, and plant in growth medium, and keep the atmosphere moist.
When roots have developed, plant in a location where you can protect it through the first winter. Some suggest building a mimi-greenhouse of plastic, straw and more plastic. This would sandwich the straw between the plastic to keep the straw warm, and preserve the thermal blanket effect.
Resources
Tuesday, March 6, 2012
Building Construction
Proverbs 24:27 "Prepare thy work without, and make it fit for thyself in the field; and afterwards build thine house."
We need to set our priorities when starting to develop a homestead. Preparing our crop land would take priority. Crop land and orchards need to be planned, prepared and planted. For even the work of preparing the soil, you will need to properly store tools. You could store tools in a covered trailer. Or you could build a garage, or workshop structure to store tools. Remember to focus on the crops and to not get distracted with the early construction of structures.
 If you are starting with bare land, you will have the advantage of being able to plan the ideal placement of your home, a barn, tool shed, etc. I encourage you to develop a master plan, so that you do not constantly have to redo previous work. If you have a master plan at the onset, you can coordinate projects to compliment each other, and in the end make the process more efficient.
Once you decide on your building master plan, set a time-line for the included projects. Organize your projects in order of importance, and so that the projects interact in ideal efficiency. Pray at each step for the Lord's blessing. Psalm 127:1 "Except the LORD build the house, they labour in vain that build it: except the LORD keep the city, the watchman waketh [but] in vain."
I like the idea of having an exact materials list for what the project will need, and obtaining the materials in an efficient manner. The more you plan, the less you will have to make miscellaneous trips to the store for materials. The farther you are out, the more important this will be!
Structures
Structures that you may want to consider in your homestead (some of these may be combined):
Construction Tools
The minimum would be a good hammer, nails and lumber. A pneumatic nail gun can save a lot of nailing time! If you add nail guns, then you will need an air compressor, hoses and power to run the compressor. A good quality power hand saw, a chop saw and a good table saw will be indispensable. A speed square, framing square, plum bob, level, masonry string, and layout marking pencil are small tools that are also needed.
I hate to say it, but when looking at power tools, you need to condition yourself to looking for and purchasing the most expensive (ie best quality) versions of the tools you need. The economy (plastic) tools are not meant to last for what you will need when building a variety of homestead structures.
Permits and building codes
Find out what is required in your area for permits, inspections and building codes. You will want the best practices for your structure, and some locations allow the home owner to do their own construction. (I would have you find out about this before you even select your property, and don't go to a place with a lot of regulation and control.) Build with better than modern standards and safety, even if no inspections are required. Building codes have been created because of past tragedies, and you do not want to cut corners with safety on your own homestead. Also keep in mind that we will experience more and more damaging wind and storms as time goes by.
Home construction video series
Resources
We need to set our priorities when starting to develop a homestead. Preparing our crop land would take priority. Crop land and orchards need to be planned, prepared and planted. For even the work of preparing the soil, you will need to properly store tools. You could store tools in a covered trailer. Or you could build a garage, or workshop structure to store tools. Remember to focus on the crops and to not get distracted with the early construction of structures.

Once you decide on your building master plan, set a time-line for the included projects. Organize your projects in order of importance, and so that the projects interact in ideal efficiency. Pray at each step for the Lord's blessing. Psalm 127:1 "Except the LORD build the house, they labour in vain that build it: except the LORD keep the city, the watchman waketh [but] in vain."
I like the idea of having an exact materials list for what the project will need, and obtaining the materials in an efficient manner. The more you plan, the less you will have to make miscellaneous trips to the store for materials. The farther you are out, the more important this will be!
Structures
Structures that you may want to consider in your homestead (some of these may be combined):
- home
- root cellar
- firewood storage under cover
- garage
- tool shed
- work shop
- pole barn for tractor and implement storage
- greenhouse
- seed starting room
- produce washing / packing area
- canning kitchen
- maple sugar shack
- animal barn(s)
- chicken coup
Construction Tools
The minimum would be a good hammer, nails and lumber. A pneumatic nail gun can save a lot of nailing time! If you add nail guns, then you will need an air compressor, hoses and power to run the compressor. A good quality power hand saw, a chop saw and a good table saw will be indispensable. A speed square, framing square, plum bob, level, masonry string, and layout marking pencil are small tools that are also needed.
I hate to say it, but when looking at power tools, you need to condition yourself to looking for and purchasing the most expensive (ie best quality) versions of the tools you need. The economy (plastic) tools are not meant to last for what you will need when building a variety of homestead structures.
Permits and building codes
Find out what is required in your area for permits, inspections and building codes. You will want the best practices for your structure, and some locations allow the home owner to do their own construction. (I would have you find out about this before you even select your property, and don't go to a place with a lot of regulation and control.) Build with better than modern standards and safety, even if no inspections are required. Building codes have been created because of past tragedies, and you do not want to cut corners with safety on your own homestead. Also keep in mind that we will experience more and more damaging wind and storms as time goes by.
Home construction video series
- Framing Floors and Stairs (video)
- Framing Walls (video)
- Framing Roofs (video)
- Construction Companion Book (pdf)
Structures, Tips and Plans
- Greenhouse Structures (pdf)
- Farm Structures and Plans (web list)
- Farm Information, videos and information NDSU (web list)
- Root Cellar (pdf)
Resources
Sunday, February 5, 2012
Trial by Fire
We have been clearing an overgrown field in order to expand our food growing potential. I feel that we have a window of opportunity to prepare a garden for the coming hard times. In my experience, you can grow food on new land, but the prep of the land takes time. You have to clear it, test and amend it, and incorporate it into your garden master plan. We all have no time to loose.
There is only so much land you can clear by hand, especially if your land has trees. The largest tree we removed was around 50 feet tall and had a diameter of around 2 feet. To remove stumps like these takes a lot of work. We have added mechanical horsepower to help in the process.
 In the center of the field, there is a large depression in the earth. Perhaps it is a sink hole, or perhaps an ancient homestead basement. Into this hole we piled brush, cotton wood trees (not good wood for us to save for fire wood), roots and brambles. We lit the pile on fire, and have had it actively burning for several days. Every now and then we stir the pile and get the brush at the edges positioned into the center so it will also burn. After sundown I came to the pile to check on it, and it needed a stir to keep it burning through the night, so I whipped out our brand new tractor with a front end loader to push the logs and brush better into the center of the pile. As I pushed a large pile of brush into the fire, I was not focused on exactly where I was around the pit. The front tires of the tractor fell over a small two foot cliff into the pit, and I soon realized the tractor was completely stuck. Even with 4 wheel drive and all tires spinning, the tractor would not back out over that small cliff.
With the tractor half in the pit and half out I became rather anxious. The pile of new material I had just pushed in was starting to ignite. I lifted the front end loader away from the flames, and wondered what I could do. I could not drive forward, as that would be directly into a now raging inferno, and would assure the total loss of the tractor.
I quickly called a friend who lived several miles away for his help, asking him to bring a chain to add power to pull the tractor out. The short call was ended abruptly with my friend saying, "I am on my way. Click." Next I called Sunshine to bring water in what ever she could find to carry it in. She immediately started filling two 5 gallon buckets at the house. I could walk around the front of the tractor and it was not in the flames and was not too hot to touch. The moments seemed like a long time, and the fire was building. Before Sunshine was able to fill 10 gallons, my neighbor charged up the drive. Oh what a joy to see his headlights coming.
He ran over with his chain, and hopped on the tractor. He knew a trick he had used many times to get unstuck, which I was to green to have understood. I had tried to lift the front end up using the front end loader while backing out, but to no avail. He set the bucket full tilt down, lifted the front of the tractor, and then rotated the tilt of the bucket outward adding a powerful push backwards. This with the four wheel drive and wheel differential engaged he was able to slowly inch the tractor back out of the pit. Just as he got off the tractor, Sunshine flew up with the car, and ran over buckets in hand. What a relief to see the tractor out of the pit on on level ground. We doused the front end loader for good measure, to make sure it was cooled down.
All ended well with not a scratch on the new tractor. This story is a bit humbling. If I was into this blog for ego, I would not retell it. The biggest problem was my lack of experience. A special thanks to a quick responding friend who literally flew in an instant to my side. It seemed impossible to get there as fast as he did. Perhaps angels propelled him onward.
Trials of life
Not every trial in life is one that we drive into. Not every fire is self inflicted. Our 5 year old nephew is recovering from a diagnosis of leukemia. A close friend is in the fire of a preliminary diagnosis of bone cancer. Suffering makes us want to ask, Why? In many cases, the best answer I have found is in Matthew 13:28: "An enemy hath done this."
There is a song that I really appreciate: Walking Through the Flames. It talks about fire. Many years ago, three Hebrew youths where commanded to worship an idol image, or be burned alive. They stood, literally, for their faith in God. They faced the fury of the king. The only part on them that burned was the ropes that had bound them. You can read the entire story in the Bible: Daniel chapter 3.
With this introduction, read the words of this poem, and notice the 3rd verse. This applies to you and to me. It applies to our times today.
Walking Through the Flames (audio)
Many years ago In a time of woe
Three young men faced a bitter test.
For the king decreed that they not be freed,
But instead he had bound them fast
Because they would not bow the knee except to God on high.
Into the flames with great disdain, these men were thrown to die.
But who would have thought that the flames would set them free?
And who would have thought that they’d gain the victory?
When with God our lot we cast,
We have more than we could ask
We’ll go walking through the flames with the Son of God.
When this evil king had performed this thing,
He sat down upon his throne.
But when he took yet a second look
He cried out with astonished tone,
“Did we not cast into the fire a group that numbered three?
Now they’re walking round as though unbound with a fourth like Deity!”
But who would have thought that the flames would set them free?
And who would have thought that they’d gain the victory?
When with God our lot we cast,
We have more than we could ask
We’ll go walking through the flames with the Son of God.
God has made it known to His very own
Tribulations they must bear.
For this world is not any friend to God.
In His cross we have a share.
But when the hour of trial comes and fire is all around
We’ll find the place we’re walking on is really holy ground.
And praise be to God that the flames will set us free
And praise be to God, we shall gain the victory.
When with God our lot we cast,
We’ll have more than we could ask.
We’ll go walking through the flames with the Son of God.
When with God our lot we cast,
We’ll have more than we could ask.
We’ll go walking, walking, walking through the flames with the Son of God.
With the Son of God!
There is only so much land you can clear by hand, especially if your land has trees. The largest tree we removed was around 50 feet tall and had a diameter of around 2 feet. To remove stumps like these takes a lot of work. We have added mechanical horsepower to help in the process.

With the tractor half in the pit and half out I became rather anxious. The pile of new material I had just pushed in was starting to ignite. I lifted the front end loader away from the flames, and wondered what I could do. I could not drive forward, as that would be directly into a now raging inferno, and would assure the total loss of the tractor.
I quickly called a friend who lived several miles away for his help, asking him to bring a chain to add power to pull the tractor out. The short call was ended abruptly with my friend saying, "I am on my way. Click." Next I called Sunshine to bring water in what ever she could find to carry it in. She immediately started filling two 5 gallon buckets at the house. I could walk around the front of the tractor and it was not in the flames and was not too hot to touch. The moments seemed like a long time, and the fire was building. Before Sunshine was able to fill 10 gallons, my neighbor charged up the drive. Oh what a joy to see his headlights coming.
He ran over with his chain, and hopped on the tractor. He knew a trick he had used many times to get unstuck, which I was to green to have understood. I had tried to lift the front end up using the front end loader while backing out, but to no avail. He set the bucket full tilt down, lifted the front of the tractor, and then rotated the tilt of the bucket outward adding a powerful push backwards. This with the four wheel drive and wheel differential engaged he was able to slowly inch the tractor back out of the pit. Just as he got off the tractor, Sunshine flew up with the car, and ran over buckets in hand. What a relief to see the tractor out of the pit on on level ground. We doused the front end loader for good measure, to make sure it was cooled down.
All ended well with not a scratch on the new tractor. This story is a bit humbling. If I was into this blog for ego, I would not retell it. The biggest problem was my lack of experience. A special thanks to a quick responding friend who literally flew in an instant to my side. It seemed impossible to get there as fast as he did. Perhaps angels propelled him onward.
Trials of life
Not every trial in life is one that we drive into. Not every fire is self inflicted. Our 5 year old nephew is recovering from a diagnosis of leukemia. A close friend is in the fire of a preliminary diagnosis of bone cancer. Suffering makes us want to ask, Why? In many cases, the best answer I have found is in Matthew 13:28: "An enemy hath done this."
There is a song that I really appreciate: Walking Through the Flames. It talks about fire. Many years ago, three Hebrew youths where commanded to worship an idol image, or be burned alive. They stood, literally, for their faith in God. They faced the fury of the king. The only part on them that burned was the ropes that had bound them. You can read the entire story in the Bible: Daniel chapter 3.
With this introduction, read the words of this poem, and notice the 3rd verse. This applies to you and to me. It applies to our times today.
Walking Through the Flames (audio)
Many years ago In a time of woe
Three young men faced a bitter test.
For the king decreed that they not be freed,
But instead he had bound them fast
Because they would not bow the knee except to God on high.
Into the flames with great disdain, these men were thrown to die.
But who would have thought that the flames would set them free?
And who would have thought that they’d gain the victory?
When with God our lot we cast,
We have more than we could ask
We’ll go walking through the flames with the Son of God.
When this evil king had performed this thing,
He sat down upon his throne.
But when he took yet a second look
He cried out with astonished tone,
“Did we not cast into the fire a group that numbered three?
Now they’re walking round as though unbound with a fourth like Deity!”
But who would have thought that the flames would set them free?
And who would have thought that they’d gain the victory?
When with God our lot we cast,
We have more than we could ask
We’ll go walking through the flames with the Son of God.
God has made it known to His very own
Tribulations they must bear.
For this world is not any friend to God.
In His cross we have a share.
But when the hour of trial comes and fire is all around
We’ll find the place we’re walking on is really holy ground.
And praise be to God that the flames will set us free
And praise be to God, we shall gain the victory.
When with God our lot we cast,
We’ll have more than we could ask.
We’ll go walking through the flames with the Son of God.
When with God our lot we cast,
We’ll have more than we could ask.
We’ll go walking, walking, walking through the flames with the Son of God.
With the Son of God!
Friday, January 27, 2012
Creating a Garden
Growing plants is a delightful experience. As artistic and colorful as plants, it is also how we survive, which adds a great reality factor to this endeavor of raising food. So how do you get a love for gardening? I think the first step is to expose yourself to the wonder of watching a seed germinate, and grow. Later, the gardener comes to realize that they do not have control of the seed, they simply cooperate with a higher power to sustains the seed and all life. We recently visited Sunshine's parents, and I asked them when they caught the love of gardening. Sunshine's Dad describes gardening as something that has just become a part of who he is. From a young boy to now advanced age, he has loved gardening.
And what about you and I? How do we get started with gardening and farming, if we did not grow up with our hands in the soil? How do we jump start the learning process, and become proficient ourselves? This article is to help break down the process a bit, and make it easier for your to create a garden this coming growing season. Perhaps you are like us, and have had a hobby garden, and are now ready to get serious with your farming activity, and want to expand your farm land, by reclaiming some existing ground around your home.
Garden size
The size of your garden would depend on your needs and produce goals. So, what are your goals? Do you want to feed your family with 80% of your food consumption for one year? Do you want to plan on extra for hard times or for your neighbors if they become in need? Find a realistic goal, and don't bite off too much all at once.
Several sources talk about 1/2 an acre being enough land to feed a family of 4. I agree this is enough to provide the vegetables for a family of 4, but it would not supply all of the grains that my family consumes in a year. Your growing season and soil quality should also be taken into consideration. Growing cycles per growing season is a key consideration. How many times can you produce a crop from seed to harvest in the growing season? With creative planning, you can sneak in an extra growing cycle and perhaps two. (More on the idea of maximizing growing cycles further down in this article.)
Another consideration that you want to think about is sustainability, and land to allow growing green manures for building up your garden soil. I think it ideal to have a field you could alternate with green manures and vegetable crops. This effectively doubles the size of land needed for your crop production goals.
Steps
Remember the first year in a plot will likely not be the best year. If you have followed these steps, especially adding the amendments that the soil needs, I think you will have a fine harvest.
Also review the article: Creating an Orchard
And what about you and I? How do we get started with gardening and farming, if we did not grow up with our hands in the soil? How do we jump start the learning process, and become proficient ourselves? This article is to help break down the process a bit, and make it easier for your to create a garden this coming growing season. Perhaps you are like us, and have had a hobby garden, and are now ready to get serious with your farming activity, and want to expand your farm land, by reclaiming some existing ground around your home.
Garden size
The size of your garden would depend on your needs and produce goals. So, what are your goals? Do you want to feed your family with 80% of your food consumption for one year? Do you want to plan on extra for hard times or for your neighbors if they become in need? Find a realistic goal, and don't bite off too much all at once.
Several sources talk about 1/2 an acre being enough land to feed a family of 4. I agree this is enough to provide the vegetables for a family of 4, but it would not supply all of the grains that my family consumes in a year. Your growing season and soil quality should also be taken into consideration. Growing cycles per growing season is a key consideration. How many times can you produce a crop from seed to harvest in the growing season? With creative planning, you can sneak in an extra growing cycle and perhaps two. (More on the idea of maximizing growing cycles further down in this article.)
 |
| Three Stump Killers |
Steps
- Determine the largest plot or total plot area possible for you to farm. Note that I have increased what I thought was possible now three times, so count in the bramble patch, and perhaps even an area with trees, as the max potential you would have available.
- Determine the size of the area you would like to farm, regardless of the land available. If you want to farm more land than you have available, then you need to be more efficient with the space you have, and pray that the Lord leads to enlarge your borders. It may be a neighbor would let you grow crops on their land, or perhaps you could relocate.
- Clear the land if it has shrubs or trees. If there are large roots or rocks, it would be good to clear these also. When I have reclaimed land, I have removed what I could and I kept what I could not remove from the ground from growing again. What you leave in the soil will take years to rot away, and that after it has stopped trying to regrow.
- Take a soil analysis of the garden plot. I have written an article about why building your soil is important, and how to take a soil analysis.
- Amend your soil based on the soil analysis results to build the soil back to ideal nutrient quantities. Consider how to introduce organic matter to the garden. If the soil has not been actively improved, I would bet it could use more organic matter. Adding organic material to your farm will be one of your constant tasks. To impact the organic matter percentage of a large garden will require massive inputs of organic material.
- Gather the materials you will use for mulch. If you have access to manures, obtain as much as you plan to use for several years, and allow it to age and heat in a mound to kill the weed seeds. Note, you do not want to till in low nitrogen materials into your soils. The effect will be to rob the garden of nitrogen. Mulching on top of the soil is suggested, but remember if you mulch with wood chips, it may take several years for these to break down sufficiently to incorporate into the soil. Plan on adding nitrogen to wood chips and straw.
- With your goal dimensions in mind (from #2), set out your parameters and draw it out on paper, with dimensions. Note the lay of the land, and any shading that may impact your garden space. This drawing will be the basis for your garden planting and rotation plan.
- Figure out how much of each crop you would like to harvest. (Crop yields, garden yields). Your plan could be as elaborate as how much your farm will distribute each week via your CSA, or as simple as our plan to put up 104 quarts of pickles for the season, providing 2 quarts per week.
- Decide when you will grow what crops. Remember your predicted last frost date in the spring, and the first frost date in the fall. Here is a CSA harvest schedule as a sample, another, another, and another. (If you are launching a full blown CSA, you have a lot more work to do than I will list here in this article. Review the Community Supported Agriculture (CSA) Resource Guide for Farmers.)
- Layout your planting plan, based on what you need to grow, by row foot. Depending on the slope of your land you may want to lay out your rows with or parallel to the slope. If slope is not a factor, many references suggest planing your rows stretching north to south. The tall crops such as peas, beans and corn, should be planted on the north side of the vegetable garden. In this way they will not shade the rest of the vegetable crops.
- Determine your planting schedule, and what plants you want to start for transplants to get a head start on the growing season. Remember that you want to stretch your harvest out, so progressive plantings should be in your plan. For example: plant some lettuce every other week for a steady harvest of greens. You will need to have room for these future plantings. If you can fit in a cover crop, all the better!
- Weed the garden on a schedule. While your seedlings are small, keep the weeds down. When your vegetables are larger, mulch heavily to keep out the weeds, and improve the growing conditions. This pattern will greatly reduce the amount of work you have to expend on your garden in both weed control and watering.
- Take good notes. There is no way to recover information if you do not record it. Take notes on your planting, dates, pests and yields. You can use these records to create next years plan, and remember to rotate your crops.
- Try something new each year, just as an experiment. Try a new variety or new gardening method.
Also review the article: Creating an Orchard
Monday, January 16, 2012
Tractor Safety
Farming is a dangerous profession, and there is one item that creates this risk: the tractor. I personally know several people who have been killed on their tractors. The most likely cause of death is the tractor rolling over and crushing the driver. There simply is not enough time to jump free. Do not consider this your avenue of escape. Tractors can tip to the side on an incline. They can also tip nose up and overturn. ROPS (roll over protection systems) and seat belts save lives. Do not operate a tractor without both of these safety systems.
The next dangerous area of a tractor is the PTO. This rotating shaft at the rear of the tractor that can lead to death or worse. I don't want to be graphic. Loose clothing can be caught in the PTO, and faster than it takes to tell about it, you can be wound around the shaft and loosing body parts left and right. Never wear loose clothing around a tractor, and never approach an engaged PTO. Note: the tractor will not stop or bog down even if you or body parts are being wound around the shaft.
The older the tractor, the fewer the safety systems will be available. Some older tractors do not disengage their PTO. This means that you can not turn off the PTO in some situations where you would like to, and if connected to an implement, it is always working. This makes these older tractors especially dangerous. Get a tractor that you can disengage the PTO.
Some tractors have one nose wheel, like a tricycle, called row crop tractors. This wheel configuration narrows the wheel base, making the tipping potential greater. I suggest you avoid this type of tractor.
I have experienced the nose of the tractor rising when pulling a large stump from the ground. Be prepared and don't overturn.
One person dies in a tractor accident nearly every day in the United States, according to the National Institute for Occupational Safety and Health (NIOSH). Don't be a statistic, think before you move, and anticipate danger.
Resources:
 Our tractor selection:
The next dangerous area of a tractor is the PTO. This rotating shaft at the rear of the tractor that can lead to death or worse. I don't want to be graphic. Loose clothing can be caught in the PTO, and faster than it takes to tell about it, you can be wound around the shaft and loosing body parts left and right. Never wear loose clothing around a tractor, and never approach an engaged PTO. Note: the tractor will not stop or bog down even if you or body parts are being wound around the shaft.
The older the tractor, the fewer the safety systems will be available. Some older tractors do not disengage their PTO. This means that you can not turn off the PTO in some situations where you would like to, and if connected to an implement, it is always working. This makes these older tractors especially dangerous. Get a tractor that you can disengage the PTO.
Some tractors have one nose wheel, like a tricycle, called row crop tractors. This wheel configuration narrows the wheel base, making the tipping potential greater. I suggest you avoid this type of tractor.
I have experienced the nose of the tractor rising when pulling a large stump from the ground. Be prepared and don't overturn.
One person dies in a tractor accident nearly every day in the United States, according to the National Institute for Occupational Safety and Health (NIOSH). Don't be a statistic, think before you move, and anticipate danger.
Resources:
- Tractor safety is no accident (web)
- General tractor safety (web)
- Personal tractor stories (web)
- The Ten Commandments of tractor safety (pdf)
I considered these articles when we were looking for a good farm tractor:
Our tractor wish list items:
- Has or able to add ROPS and seat belt
- Spread front wheels (not tricycle)
- Has rear PTO, able to disengage.
- 32 - 45 hp. You need power in this range to plow.

- Kubota 3800, 38 hp
- 66" wide front end loader
- 7.7' backhoe
- box blade
- single roll over plow
- small disc unit
- single tine chisel (considering)
- rototiller (considering)
- mower (later)
- snow blower (later)
Friday, January 6, 2012
Chickens
I really like chickens. Chickens are sociable, personable, inquisitive and have a happy disposition. Chickens on the homestead provide eggs and/or meat. Being vegetarians, Sunshine wonders why I am so interested in Chickens at all! I do eat an occasional egg white, but have tended to avoid the yolk not wanting extra cholesterol in my diet. One thing is sure, if you are going to eat meat, dairy or eggs, raise it yourself! I know exactly what has gone into the diet and environment of our birds, and I enjoy giving them greens and clean kitchen scraps to augment their vegetarian feed diet.
All of our chickens absolutely love kale. There is a load of calcium and minerals in kale, and these birds are smart enough to devour it before anything else. They also enjoyed the corn on the cob we gave them. One of our really bright birds would stand right beside me as I shucked the corn cobs, ever ready to spy a worm at the corn tip. It was as if we were working together as a team. She was talking the entire time, looking and always eager to inspect each ear as I opened it!
You should hear the chickens call and sing as any of us approach their coup. They are excited to have us as their guests, and always want to see what we have brought them.
Getting started
 We started with Chickens in the spring of 2011, with the purchase of 7 pullets. Six have survived to laying maturity. We purchased the seventh, just in case we had a rooster, as we had wanted 6 layers. We purchased our as sexed female pullets (90+% female rather than 50% "free run") and kept them under a heat lamp to avoid chilling. They need to be able to move closer or farther away from the heat to regulate their body temperature. Reduce the temperature by 5 degrees per week until the supplemental heat is no longer needed. Pullet food is the "stratch" or "crumbles" feed, and an available supply of water is needed.
Decide what you want the birds for, and purchase a breed that fits that goal. Since we do not eat flesh, our goal was egg laying production, predominantly for sale. In our experience Isa Browns are good egg layers. We tried three varieties, and the Isa's are tops. They do not have a large body for meat production, but seem very efficient at laying. The blue eggs from the Americanas are just a bit smaller, but we find our customers really like the variety of natural egg color, and some even prefer the blue eggs.
 Chickens grow up quickly, and before we had the coup finished, we were ready for them to be out of our house. They stir up a lot of dust.
We have raccoon, coyotes and weasels on our land, so we had to build the coup like Fort Knox. Our wire mesh is hardware cloth with 1/2 inch squares. Predators can enter through the ground, roof or any crack larger than 1/2 inch. Our design seems to work well for a small flock. The coup is elevated off the ground to give them more space to run, and we suspend food and heated water under the coup dangling above the ground. Chickens should have 2-3 square foot of enclosed coup space, and 4-5 square foot open run space, per bird.
Following is our chicken calendar for 2011
May 4 We purchased 7 pullets from a local farm supply. (1 day old)
May 10 Chickens have doubled in size, some hopping flights
July 8 Working (feverishly) on the chicken coup.
July 14 Chickens move into the coup.
Sept 27 First egg laid by a Isa Brown.
Nov 9 One chicken dies
Dec Steady egg production of 4-6 per day.
Our boys are selling our surplus to neighbors. The demand is so great we are increasing our flock in 2012. There is a demand for both local food, knowing where it has come from, and that the birds are treated humanely. This is important for us as well. In actuality, our birds are treated a bit too much like pets! But people who purchase from us know how we care for our birds; how we treat them and feed them, and give them supervised free range time. We do not medicate our birds, nor stimulate them artificially with lights or chemicals. Our customers seek us out, knowing that these eggs are not the result of a hens life spent in a 1x1 foot prison, never touching the grass or any semblance of natural life, as I fear is the case with mass production hen houses.
I think eggs would be an easy item to add to a CSA. The eggs keep well, and you could easily give some each week or every other week depending on your customers interest, and the size of your flock.
On egg laying, a friend told me that when they first started with chickens, their chickens were not laying. They put in a plastic egg in their nest box, and that get them "going" and production started. I could not really see how this related to when the chickens would start laying, but we gave it a try. I tease you not in this story! On the morning of Sept 27 our boys put in a plastic egg into the nest box, and within a few hours, they presented Sunshine with a very real chicken egg. I don't know if this is some kind of chicken mind game or what, but it worked for us just like what we were told. The very same day! I wonder if the chicken was thankful, like, "wow, I sure am glad they showed me where to put that thing!"
 We have been told that chickens lay fewer eggs in the winter. We get 4-6 eggs a day, and we have not had any drop off yet because of winter. The weather is starting to get colder, so we will see how they respond to that stress. I have read that the egg production drops off because of the daylight being shorter, which means they have less time to eat for egg production. But we have not seen any egg quantity change so far with the shorter day length, and actually, our day length is now getting longer. We do not use lights on the chickens at night. Our chickens are getting a lot of nutrient rich greens, so perhaps that is a factor in their not having to slow down production. I will return to this paragraph with more analysis in the spring, to see if we had any decline and if so what we could attribute it toward.
We have not had any real problems with the Chickens to date. We do not heat their living space, but shield them from the cold winds and drifting snow with clear plastic attached to the outside of the framing members. It looks a bit more like a green house right now. There are two schools of thought related to coup temperature. One is to provide heat, and the other is to provide more fresh air, no matter the temperature. We follow the fresh air thought, and our birds do not seem to suffer in the cold. The coup is more protected than the run, but even on cold days, our birds spend most of their day "outside" in the run. It is important to keep their feet dry. In the night, they need a roost where they can grab the roost beam, and cover their toes with their feathers to protect their toes. With that allowance, we find no need to heat their coup.
We have a electric water warmer which is very important during the winter to keep it from freezing over. Chickens need water, not a lot, but when they need it, they need it. We have been told that a thirsty chicken can have impaired egg production for life. We always have water available to them. My ideal would be to have them free range all the time, but I am sure we would loose them from predation over time.
In summary, our experience has been thumbs up! Join us and get some chickens this spring.
 Trivia
There is an air sack within the egg. Water can pass through the egg shell. As the water in the egg slowly evaporates, the air sack becomes larger. You can tell a fresh egg from an older egg by looking at the comparative size of the air sack. These samples are hard boiled. Can you see which egg is 2 week older than the other?
Resources
All of our chickens absolutely love kale. There is a load of calcium and minerals in kale, and these birds are smart enough to devour it before anything else. They also enjoyed the corn on the cob we gave them. One of our really bright birds would stand right beside me as I shucked the corn cobs, ever ready to spy a worm at the corn tip. It was as if we were working together as a team. She was talking the entire time, looking and always eager to inspect each ear as I opened it!
You should hear the chickens call and sing as any of us approach their coup. They are excited to have us as their guests, and always want to see what we have brought them.
Getting started

Decide what you want the birds for, and purchase a breed that fits that goal. Since we do not eat flesh, our goal was egg laying production, predominantly for sale. In our experience Isa Browns are good egg layers. We tried three varieties, and the Isa's are tops. They do not have a large body for meat production, but seem very efficient at laying. The blue eggs from the Americanas are just a bit smaller, but we find our customers really like the variety of natural egg color, and some even prefer the blue eggs.
 Chickens grow up quickly, and before we had the coup finished, we were ready for them to be out of our house. They stir up a lot of dust.
We have raccoon, coyotes and weasels on our land, so we had to build the coup like Fort Knox. Our wire mesh is hardware cloth with 1/2 inch squares. Predators can enter through the ground, roof or any crack larger than 1/2 inch. Our design seems to work well for a small flock. The coup is elevated off the ground to give them more space to run, and we suspend food and heated water under the coup dangling above the ground. Chickens should have 2-3 square foot of enclosed coup space, and 4-5 square foot open run space, per bird.
Following is our chicken calendar for 2011
May 4 We purchased 7 pullets from a local farm supply. (1 day old)
May 10 Chickens have doubled in size, some hopping flights
July 8 Working (feverishly) on the chicken coup.
July 14 Chickens move into the coup.
Sept 27 First egg laid by a Isa Brown.
Nov 9 One chicken dies
Dec Steady egg production of 4-6 per day.
Our boys are selling our surplus to neighbors. The demand is so great we are increasing our flock in 2012. There is a demand for both local food, knowing where it has come from, and that the birds are treated humanely. This is important for us as well. In actuality, our birds are treated a bit too much like pets! But people who purchase from us know how we care for our birds; how we treat them and feed them, and give them supervised free range time. We do not medicate our birds, nor stimulate them artificially with lights or chemicals. Our customers seek us out, knowing that these eggs are not the result of a hens life spent in a 1x1 foot prison, never touching the grass or any semblance of natural life, as I fear is the case with mass production hen houses.
I think eggs would be an easy item to add to a CSA. The eggs keep well, and you could easily give some each week or every other week depending on your customers interest, and the size of your flock.
On egg laying, a friend told me that when they first started with chickens, their chickens were not laying. They put in a plastic egg in their nest box, and that get them "going" and production started. I could not really see how this related to when the chickens would start laying, but we gave it a try. I tease you not in this story! On the morning of Sept 27 our boys put in a plastic egg into the nest box, and within a few hours, they presented Sunshine with a very real chicken egg. I don't know if this is some kind of chicken mind game or what, but it worked for us just like what we were told. The very same day! I wonder if the chicken was thankful, like, "wow, I sure am glad they showed me where to put that thing!"

We have not had any real problems with the Chickens to date. We do not heat their living space, but shield them from the cold winds and drifting snow with clear plastic attached to the outside of the framing members. It looks a bit more like a green house right now. There are two schools of thought related to coup temperature. One is to provide heat, and the other is to provide more fresh air, no matter the temperature. We follow the fresh air thought, and our birds do not seem to suffer in the cold. The coup is more protected than the run, but even on cold days, our birds spend most of their day "outside" in the run. It is important to keep their feet dry. In the night, they need a roost where they can grab the roost beam, and cover their toes with their feathers to protect their toes. With that allowance, we find no need to heat their coup.
We have a electric water warmer which is very important during the winter to keep it from freezing over. Chickens need water, not a lot, but when they need it, they need it. We have been told that a thirsty chicken can have impaired egg production for life. We always have water available to them. My ideal would be to have them free range all the time, but I am sure we would loose them from predation over time.
In summary, our experience has been thumbs up! Join us and get some chickens this spring.
 Trivia
There is an air sack within the egg. Water can pass through the egg shell. As the water in the egg slowly evaporates, the air sack becomes larger. You can tell a fresh egg from an older egg by looking at the comparative size of the air sack. These samples are hard boiled. Can you see which egg is 2 week older than the other?
Resources
Subscribe to:
Posts (Atom)
